

 Canada
 Global
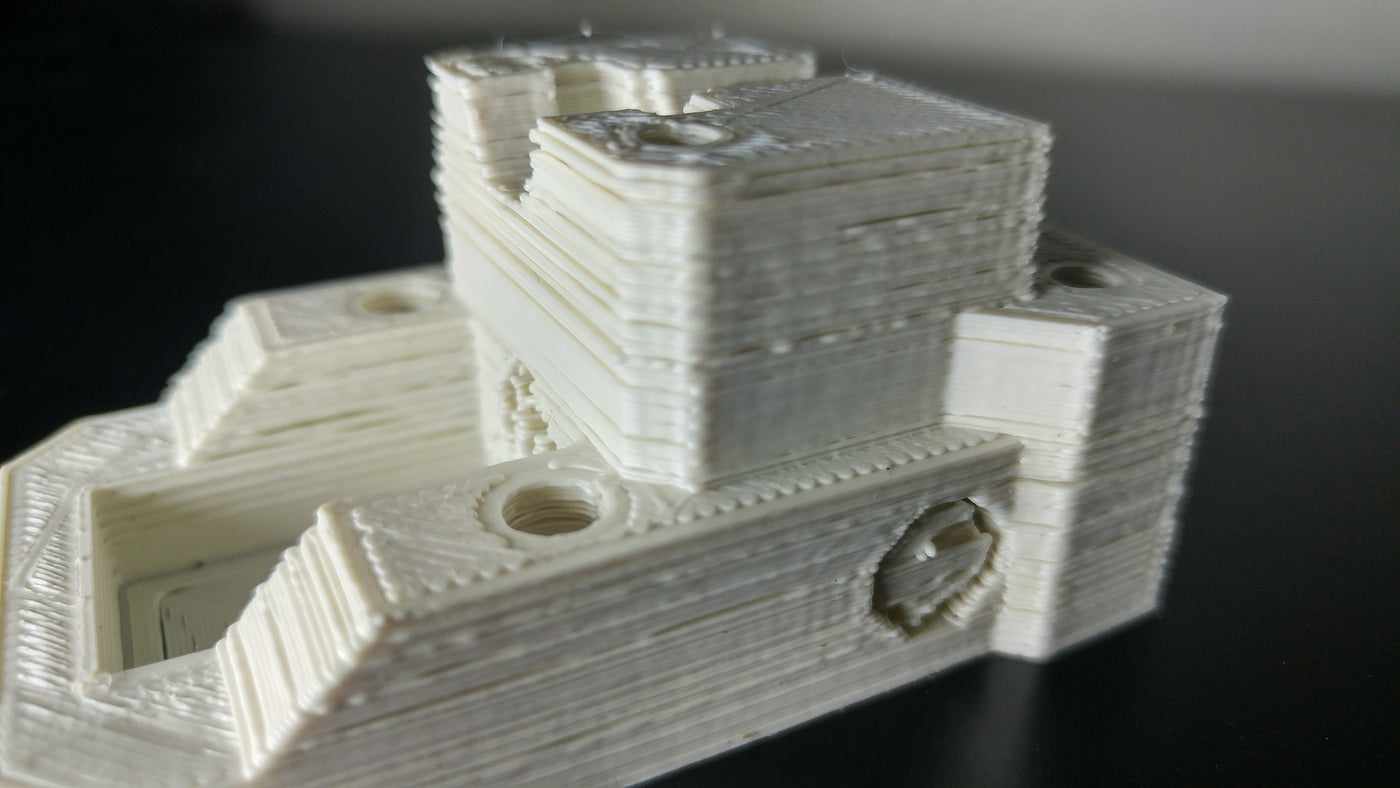
When you are experiencing Z-axis wobble, you will see what looks like repeated minor layer shifts, sometimes with every single layer. If the wobble is minor, it may just look like the print surface is not clean. You can hone in all of the slicer settings properly, but it will not fix this issue. This is an issue with the frame of your printer and not an issue with settings.
Tighten extruder carriage and hotend setup
This is probably the most common cause for a wobbly looking print. Your extruder carriage is moving and rattling constantly over prints causing screws to loosen over time. This is especially common on 3D printed parts, since their tolerances are not as tight as mass produced carriages and extruders. This will be far less of an issue if using an E3D extruder with an E3D hotend on a $3,000+ machine than on a $200 stock Prusa i3 with printed parts.
This is because more expensive machines usually have higher end parts holding everything together. Lower end machines will use printed parts with minor tolerance issues, and may even use zip ties to hold belts and bearings in place. These zip ties can become stretched over time and results in a carriage that is not harnessed tight.
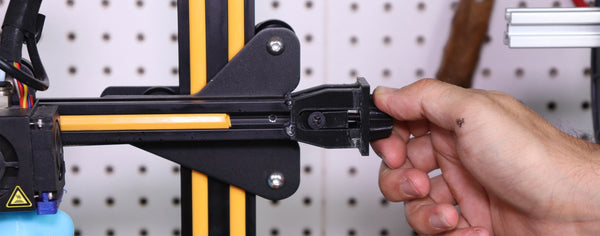
Frequently check to see if you can easily move or rattle your hotend/extruder setup. Lower the hotend to room temperature and literally grab the hotend and try and move it around. Don’t be rough, just give it a little rattle. If you see the carriage or
Z-Axis Wobble 313
hotend rattle or have free play, you will need to fix that in order to get rid of this problem. Machines that don’t have any free play on their hotend result in the least amount of Z-wobble.
If you can, you will likely need to tighten the screws/bolts that hold the extruder or hotend to the carriage. If tightening doesn’t fix the problem, check to see if your printed parts are worn out or off tolerance. If they are, you will need to reprint them. If not, you can move on to the next solution.
Replace old/worn out bearings and make sure bearings and rollers are harnessed tight
If your carriage is rattling when you manually try to move it, but your entire extruder carriage and hotend are tightly set up, your bearings may have become loose over time. As you can imagine this is far more common with plastic bearings than with metal ones.
This bearing issue is specific to printers with linear rods, not for linear rails or aluminum extrusion with rollers. Linear rails are preferred and do not have this issue. For printers with rollers, such as those on an Ender 3, you will want to rotate the nut on the roller to hold it tight to the aluminum extrusion. You do not want your rollers to spin freely. This nut is not a “righty tighty” sort of nut. It will have more pressure on one side, and less on the other, so a full rotation will be back at the starting point. Turn this until the roller is held on tight, and do this for all axes.
When doing this rattle test on a printer with smooth rods, you should be able to see if there is a small gap in the X bearings.
I didn’t think this could happen until I replaced a 2 year old printer’s bearings who was experiencing consistent Z-axis wobble, and it fixed the issue instantaneously. These were on Lulzbot TAZ 5 machines that used plastic bearings. The replacement bearings had no free play and gripped the linear rods tight.
If you are using a less expensive machine that uses zip ties or something similar to hold the bearings in place, you will need to replace these with new zip ties, or find a part online to print that will hold the bearings tight. I have come to prefer linear rails just to reduce this ever becoming an issue.
Ensure your hotend and nozzle is set up properly and tight
Every hotend setup needs to be assembled in a slightly different fashion, but they all require you to do final tightening with a heated hotend.
When the hotend heats, the metal expands and can cause your once tight nozzle/heater block to actually have minor gaps. This can lead to rattling of the heater block throughout the print, causing an ugly wobble in your print.
If you notice that your heater block is loose when hot, or that you constantly have to brush off the nozzle from excess material, you will likely need to tighten these parts.
I always suggest doing the final tightening of your nozzle and heater block when heated to 240°C, using proper gloves and tools. Remember that you have a high chance of burning yourself, so only do this with extreme caution. If you tighten the hotend/nozzle when at room temperature, you will find it won’t be tight at 240°C.
You still want to make sure to not over tighten anything. I have broken quite a few heater blocks, nozzles, and heat break barrels due to over tightening. These parts, especially when hot, can easily snap under pressure. This hasn’t happened to me in a while, but would occur when I didn’t understand how careful I should be. When you are tightening your nozzle with the hotend heated, make sure to only tighten until you know that the nozzle and heat block are not loose and will not unscrew during the print – don’t muscle it.
If you still are experiencing your hotend is rattling and you have made sure it’s harness is tight, you will likely need to upgrade or replace your nozzle, heat block, or entire hotend. Poorly made parts will not have tight tolerances and can lead to these gaps in your threads. You can try to save money if you want, but I only purchase from reputable manufacturers for this reason. All of my hotends are from E3D, since they are one of the most respected companies in the 3D printing field.
Make sure the build plate is harnessed tight
Just as with the extruder carriage and bearings, you will need to make sure your print bed does not have any rattling in it. This will not be an issue with CoreXY machines, since the bed only moves up and down.
When using a Cartesian machine, free-play or rattling in the build plate will result in Z-wobble, just as it would with rattling in the hotend. When not printing, and with the bed at room temperature, give it a good rattle up and down and left and right. The print bed should not have any movement other than what comes from the whole machine moving. If the print bed has some free play in the bearings, rollers, or harness, this will need to be fixed.
On one of my old inexpensive DIY machines, the build plate harnesses were attached to the bearings via zip-ties. These zip ties seem to stretch over about a month or two of printing, and so I would cut them off and replace them as needed.
Just as with the carriage, you will need to replace any plastic bearings that have become worn out over time (unless using a linear rail system). For printers with rollers such as the Ender 3, you will want to rotate that nut until the rollers are holding onto the frame tight.
Finally, make sure that the parts that are connecting the bearings to the build plate are securely tightened and up to tolerance. Take your glass or other print surface off, and then tighten all of the screws that are connecting everything. These, as with all other screws, will loosen over time.
Tighten All Belts
Other than confirming all harnesses are tight and that there is zero rattling on the extruder and build plate, the next most common reason for Z-wobble is a loose belt.
As explained elsewhere in our 3D printing tips, it is possible to over tighten a belt, but it is pretty difficult to do so on low end machines where the belt is just held together via zip ties. Both the X and Y axis belts should be very springy to the touch with zero-droop.
If there is any droop in your belt, you will need to tighten. For low end, non-upgraded machines, cut the zip tie that is holding the belt together, grab some pliers, and pull tight as you put on a new zip tie. Make sure the belt is tighter than it was and that the zip tie is pinching everything so that the belt won’t slip.
I always suggest adding a belt tensioner to printers that do not have them, and luckily the popular Ender 3 V2 has these stock. Just tighten these belts until they are springy to the touch. A loose belt will definitely lead to Z-wobble and other issues.
There is likely a file on Thingiverse for your specific machine setup if you do not have these belt tightening knobs.
Be careful when adding one of these, since you will now be able to over tighten, which I had mentioned is difficult to do without this. Just turn the knob until the belt is very springy to the touch. There is no real scientific way to do this, you just want to make sure there is zero droop whatsoever.
Check for wobbly or bent rods
Using thin threaded M5 or M6 Z-rods instead of thicker M8 or M10 leadscrews can lead to a wobbly or bent rod over time. It is a major upgrade to have thick M10 leadscrews since you will experience far less Z-wobble and will almost never see a bent rod.
If you have these thinner threaded rods, just move your printer up and down in the Z-axis. You will actually be able to see this problem easily since the rods will wobble back and forth. This is exactly what happened on my DIY machine and I fixed it by upgrading to M8 leadscrews (just make sure you print all the parts you need before disassembling and upgrading).
There are some models on Thingiverse and elsewhere that help with this wobble in your threaded Z-axis rods, such as the “anti-wobble coupling” by toolson, and they actually work quite well. While this is true, they won’t be able to fix an actual bent rod and nothing will be quite as good as upgrading to thicker leadscrews.
A heavily bent rod is not common unless you frequently transport your machine. An actual bend in your threaded Z-axis rod will require you to replace it. I have only had to do this on one machine, one time in my history of printing, and it was on a thin threaded Z-rod.
While I have only had one fully bent rod, I have had plenty of ones that will wobble when moving up and down, leading to minor Z-wobble.
Add an anti-backlash spring loaded nut
These anti-backlash nuts are normally only meant for thicker leadscrews, and they help quite a lot to prevent any backlash when moving up and down in the Z-axis.
This is slightly confusing as to explain, but with these springs and added nuts, you can expect a lot less rattling and prints looking as if they have Z-wobble. Please take note of the pitch of your leadscrew since you will need to make sure your anti-backlash parts are the same. The majority of 8mm leadscrews have a pitch of 2, but you will just need to confirm with your printer specs (or with the part you buy online when upgrading).
Also make sure you are able to actually use these on the printer you are adding them too. I bought a set that were too thick to add to the CR-10 since their holes did not line up, which lead me having to return the set.
Lubricate guide rods and threaded rods
Your X and Y axis guide rods should be smooth enough so that both carriages can move around freely (when using a linear rod printer). Your Z-axis guide rods (the ones that are not threaded) should also be smooth enough for the carriage to move in the Z-direction without any skipping or any bearings getting stuck.
Most printers use self-lubricating bearings, but even these will require lubrication after frequent printing. If your bearings are getting stuck or having trouble moving during the print, you can experience some Z-axis wobble.

Get some white lithium grease apply with a rag to these non-threaded guide rods. Move the carriage around on all axis’s so that it spreads across your bearings. This should help with the issue.
Just another reason for linear rails, they should not require any additional lubrication.
Along with the smooth rods, you should also add a bit of lubrication to the threaded rods/leadscrews. Just grab some lithium grease on a rag and rub it up and down. You want to make sure these threaded rods aren’t entirely dry to the touch.
Make sure the bed can move back and forth smoothly
As mentioned in the Layer Shifts Page, if you over tighten one or multiple corners of your build plate, you will have a lot of difficulty moving the bed back and forth (of course only on Cartesian machines). This difficulty to move may lead to stepper motor skips which cause layer shifts, but can also cause some Z-wobble. You will want to make sure your bed can move back and forth easily without a ton of friction.
Is your part too tall and skinny?
This problem will not occur quite as often on a CoreXY machine, but on Cartesian 3D printers where the build plate is being moved back and forth, a tall skinny print may end up wobbling. You can use as much brim as you like with the perfect bed adhesion, but if you are printing a tall and skinny part, it will likely wobble as the bed is moved back and forth.
This wobble will make the top of your print have this Z-wobble, while the bottom of your print looks just fine.
To be honest – there is no perfect way around this. You can manually design some anchors onto your print so that as it gets taller, it is held further in place, but just printing a very tall skinny part as is will likely result in this Z-wobble.
If I am unable to design in some further anchors, I am often forced to cut extremely thin display parts in two, to be glued together post printing.
Below is a summary of how to add a very simple anchor to your part via Cura.
Anchoring Parts:
There are likely better ways to prevent rattling of tall skinny parts, but the easiest way I know of would be to anchor your print in Cura. I have rarely done this, but it definitely helps with a tall, skinny print wobbling back and forth.
Below is an example of two skinny swords from a Deadpool model. When not adding any anchors, my Cartesian machine would wobble the build plate back and forth and cause the top half of these swords to look extremely ugly (if they didn’t get knocked off entirely).
Cura now allows you to bring in a second model that intersects with your main print. They also allow you to print a part entirely as support. This means you can drag in a second object that acts only as support for your main structure.
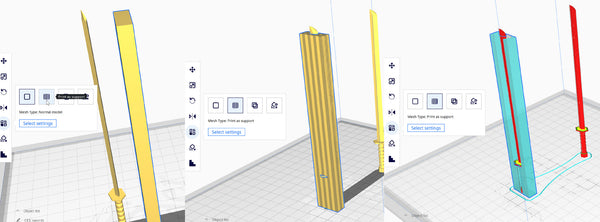
This rectangle in the example above is thin, so it won’t take up too much material, yet it will extend the anchoring for the sword (I added a second sword to compare how it will slice). After bringing in a shape that will work for your model, you can choose the model and click “Per Model Settings” and then “Print as Support”
After turning the shape into “Print as support”, you can then drag it over your tall, skinny print.
As you can see in “Layer Mode”, this entire shape is now support structure that can help to anchor your tall skinny print to help prevent this wobbling back and forth.
As mentioned – there are likely other ways to do this, this is just the simplest way I know of since it allows you to do this right in your slicing software.
Summary of Fixes and Precautions
• Tighten all of the bolts and screws that connect your hotend to your printer.
• Check to see if you need to replace printed parts on your extruder carriage.
• Reduce all rattling in the X-axis carriage.
• Replace old or worn out bearings on linear rod machines.
• Tighten rollers on printers with aluminum extrusion frames (such as the Ender 3).
• Tighten your hotend setup while heated to 240°C, making sure to not over tighten.
• Remove all wobble in your print bed including replacing any bearings and tightening all harnesses.
• Tighten both the X and Y-axis belts. There should be zero droop.
• If using a thin threaded Z-axis rod, print a part that can help guide and reduce wobble.
• If possible, upgrade to a thick M8 or M10 threaded leadscrews.
• Replace any physically bent Z-axis rod.
• Lubricate all guide and threaded rods.
• Confirm the build plate can move smoothly.
• If your part is just too tall and skinny to not wobble – you may need to cut in half or manually design in anchors.
• Think about a linear rail CoreXY machine for when you want to upgrade in the future.